Spam filtering: Difference between revisions
No edit summary |
|||
| Line 6: | Line 6: | ||
Fill out the form as illustrated in the image. Under "Rules", "X-Spam-Flag" contains "YES". Under "Actions" select "Move message to", "Junk". Then click "Save". |
Fill out the form as illustrated in the image. Under "Rules", "X-Spam-Flag" contains "YES". Under "Actions" select "Move message to", "Junk". Then click "Save". |
||
[[ |
[[File:spamfilter.png]] |
||
Please keep your Inbox tidy – move all spam to the Junk folder – so that the spam filter is learning appropriately what is spam and what is not. |
Please keep your Inbox tidy – move all spam to the Junk folder – so that the spam filter is learning appropriately what is spam and what is not. |
||
Revision as of 09:29, 1 September 2019
Spam filtering is not enabled by default. Before you enable the spam filter, consider the information about privacy below.
Enabling the spam filter
In Rouncube (cloud.yourdomain.com/roundcubemail), go to "Settings" -> "Filters". Create a new filter called "Spam Block". Note you should not need to create a new "Filter Set", but you should have at least one "Filter Set" enabled.
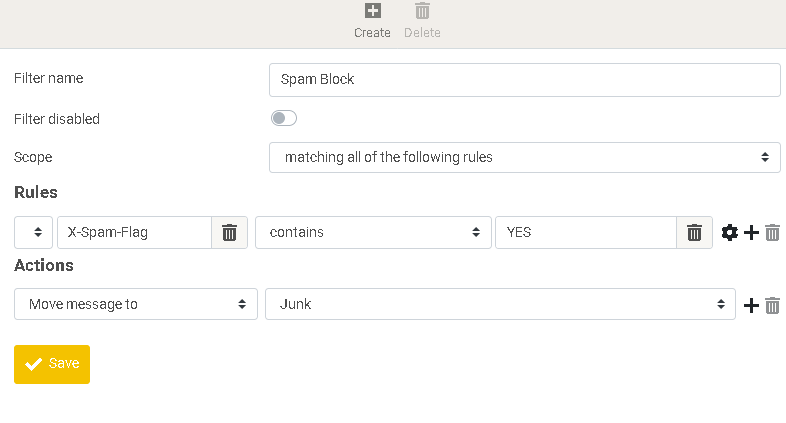
Fill out the form as illustrated in the image. Under "Rules", "X-Spam-Flag" contains "YES". Under "Actions" select "Move message to", "Junk". Then click "Save".
Please keep your Inbox tidy – move all spam to the Junk folder – so that the spam filter is learning appropriately what is spam and what is not.
Privacy policy
When you are using the spam filter, the filtering software will read the emails in the Inbox and Spam folders to learn what is spam and what is not. Even after you've deleted these emails, the spam filter might still have a copy of them in its storage which cannot be deleted. By using the spam filter you consent with this practice.
