Email forwarding: Difference between revisions
mNo edit summary |
|||
| (9 intermediate revisions by the same user not shown) | |||
| Line 1: | Line 1: | ||
__FORCETOC__ |
|||
Email forwarding used to be common, but in the age of spam it has become very difficult to forward email in a reliable way. Hence, it is not recommended to use forwarding. I strongly recommend to not rely on email forwarding for a primary email address. In some cases it can be useful to forward email from a single address that attracts little spam. |
Email forwarding used to be common, but in the age of spam it has become very difficult to forward email in a reliable way. Hence, it is not recommended to use forwarding (see [https://www.tidbitsfortechs.com/2018/06/email-forwarding-is-bad-why-you-should-never-forward-email/ this blog post]). I strongly recommend to not rely on email forwarding for a primary email address. In some cases it can be useful to forward email from a single address that attracts little spam. If you are migrating from an old email address (e.g. Gmail) to a DLNET Cloud address, I recommend to set up forwarding as described below. |
||
== Forwarding mail for |
== Forwarding mail for a cloud address to an external address == |
||
In [[webmail]], go to '''Settings''' -> '''Filters'''. The middle pane contains a list of |
In [[webmail]], go to '''Settings''' -> '''Filters'''. The middle pane contains a list of filters. At the very top, you can select a filter set (make sure it is enabled). To add a forwarding filter, click '''Create''' in the right pane. Then add the forwarding filter as described in the picture below. |
||
[[File:forward.png|border]] |
[[File:forward.png|border]] |
||
* For '''Filter name''', choose a name for the filter. |
* For '''Filter name''', choose a name for the filter. |
||
* Under '''Rules''', select '''To''' in the first drop down box and '''contains''' in the second drop down box. The third field contains the email address which you want to forward. |
* Under '''Rules''', select '''To''' in the first drop down box and '''contains''' in the second drop down box. The third field contains the email address which you want to forward. |
||
* Click the '''+''' symbol in the rules section to create a second rule. In the first drop down box, select '''...'''. In the field following it, enter "X-Spam-Flag". In the second drop down box, select '''contains not'''. In the field following it, enter "YES". |
* Click the '''+''' symbol in the rules section to create a second rule. In the first drop down box, select '''...'''. In the field following it, enter "X-Spam-Flag". In the second drop down box, select '''contains not'''. In the field following it, enter "YES". |
||
* Under '''Actions''', select '''Redirect message to''' in the first drop down box. In the field following it, enter the address to which you want to forward. |
* Under '''Actions''', select '''Redirect message to''' in the first drop down box. Or, if you want to keep a copy of the message in your inbox, select '''Send message copy to'''. In the field following it, enter the address to which you want to forward. |
||
It is recommended to not forward spam email because, first, it is harder for the receiving mail provider to identify forwarded spam as spam, and second, |
It is recommended to not forward spam email because, first, it is harder for the receiving mail provider to identify forwarded spam as spam, and second, our server's reputation can be damaged as a result of forwarding spam. |
||
== Forwarding mail for an external email address to a cloud address == |
== Forwarding mail for an external email address to a cloud address == |
||
When forwarding email to your DLNET Cloud it is recommended to forward spam as well. The following instructions are for Gmail. |
When forwarding email to your DLNET Cloud it is recommended to forward spam as well. The spam filter recognizes forwarded mail as likely spam if it is forwarded to an address containing "+spam". The following instructions are for Gmail. |
||
* Go to your Gmail settings, and select the tab '''Forwarding and POP/IMAP'''. |
* Go to your Gmail settings, and select the tab '''Forwarding and POP/IMAP'''. |
||
* In the box labeled '''Forwarding:''', click '''Add a forwarding address'''. Enter your DLNET Cloud email address. You will be asked to verify it. |
* In the box labeled '''Forwarding:''', click '''Add a forwarding address'''. Enter your DLNET Cloud email address, but add "+forward" to the portion of your email address before the @. So, if your address is "name@yourdomain.com", add "name+forward@yourdomain.com" as forwarding address. You will be asked to verify it. |
||
* Repeat the same procedure, but now add "+spam" to the portion of your email address before the @. So, if your address is "name@yourdomain.com", add "name+spam@yourdomain.com" as forwarding address. |
* Repeat the same procedure, but now add "+spam" to the portion of your email address before the @. So, if your address is "name@yourdomain.com", add "name+spam@yourdomain.com" as forwarding address. |
||
* In the '''Forwarding:''' section, select '''Forward a copy of email to''', and choose |
* In the '''Forwarding:''' section, select '''Forward a copy of email to''', and choose the "+forward" address in the drop down box. Then click '''Save changes''' at the bottom of the page. |
||
* Again in Gmail settings, go to the tab '''Filters and Blocked Addresses'''. Click '''Create new filter'''. |
* Again in Gmail settings, go to the tab '''Filters and Blocked Addresses'''. Click '''Create new filter'''. |
||
* In the field after '''Has the words''', enter "is:spam", like in the picture below. Then click '''Create filter'''. |
* In the field after '''Has the words''', enter "is:spam", like in the picture below. Then click '''Create filter'''. |
||
[[File:Isspam1.png]] |
[[File:Isspam1.png|border]] |
||
* In the next dialog, select the checkboxes '''Forward it to:''' and '''Never send it to Spam'''. In the drop down box after '''Forward it to:''', select your email address containing "+spam". Then click '''Create filter'''. See the picture below. |
* In the next dialog, select the checkboxes '''Forward it to:''' and '''Never send it to Spam'''. In the drop down box after '''Forward it to:''', select your email address containing "+spam". Then click '''Create filter'''. See the picture below. |
||
[[File:Isspam2.png]] |
[[File:Isspam2.png|border]] |
||
* Notify [[User:Lennart]] about the email address you're forwarding, so the spam filter can be appropriately configured. |
|||
Make sure you set up [[spam filtering]]. All set! |
Make sure you set up [[spam filtering]]. All set! |
||
Latest revision as of 11:42, 9 January 2021
Email forwarding used to be common, but in the age of spam it has become very difficult to forward email in a reliable way. Hence, it is not recommended to use forwarding (see this blog post). I strongly recommend to not rely on email forwarding for a primary email address. In some cases it can be useful to forward email from a single address that attracts little spam. If you are migrating from an old email address (e.g. Gmail) to a DLNET Cloud address, I recommend to set up forwarding as described below.
Forwarding mail for a cloud address to an external address[edit]
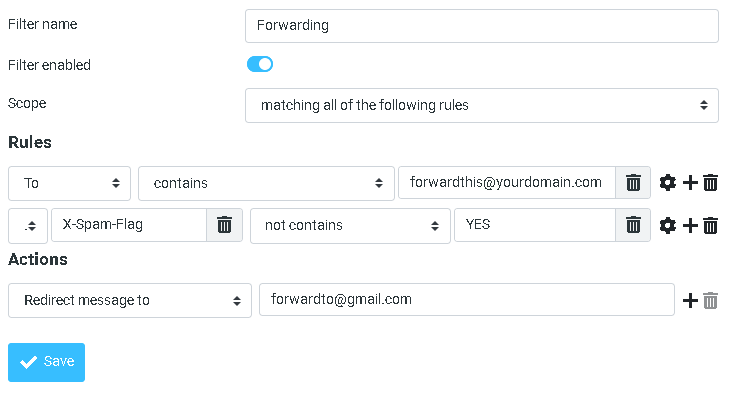
In webmail, go to Settings -> Filters. The middle pane contains a list of filters. At the very top, you can select a filter set (make sure it is enabled). To add a forwarding filter, click Create in the right pane. Then add the forwarding filter as described in the picture below.

- For Filter name, choose a name for the filter.
- Under Rules, select To in the first drop down box and contains in the second drop down box. The third field contains the email address which you want to forward.
- Click the + symbol in the rules section to create a second rule. In the first drop down box, select .... In the field following it, enter "X-Spam-Flag". In the second drop down box, select contains not. In the field following it, enter "YES".
- Under Actions, select Redirect message to in the first drop down box. Or, if you want to keep a copy of the message in your inbox, select Send message copy to. In the field following it, enter the address to which you want to forward.
It is recommended to not forward spam email because, first, it is harder for the receiving mail provider to identify forwarded spam as spam, and second, our server's reputation can be damaged as a result of forwarding spam.
Forwarding mail for an external email address to a cloud address[edit]
When forwarding email to your DLNET Cloud it is recommended to forward spam as well. The spam filter recognizes forwarded mail as likely spam if it is forwarded to an address containing "+spam". The following instructions are for Gmail.
- Go to your Gmail settings, and select the tab Forwarding and POP/IMAP.
- In the box labeled Forwarding:, click Add a forwarding address. Enter your DLNET Cloud email address, but add "+forward" to the portion of your email address before the @. So, if your address is "name@yourdomain.com", add "name+forward@yourdomain.com" as forwarding address. You will be asked to verify it.
- Repeat the same procedure, but now add "+spam" to the portion of your email address before the @. So, if your address is "name@yourdomain.com", add "name+spam@yourdomain.com" as forwarding address.
- In the Forwarding: section, select Forward a copy of email to, and choose the "+forward" address in the drop down box. Then click Save changes at the bottom of the page.
- Again in Gmail settings, go to the tab Filters and Blocked Addresses. Click Create new filter.
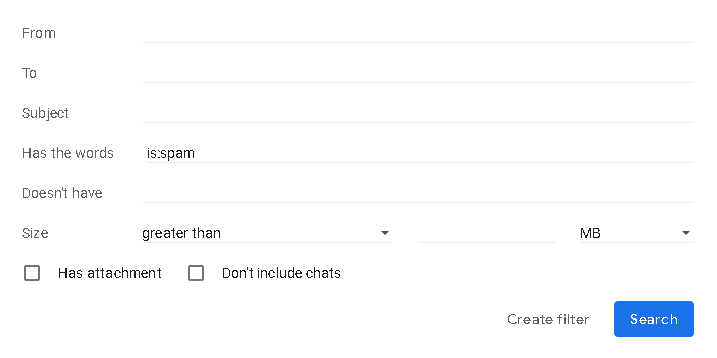
- In the field after Has the words, enter "is:spam", like in the picture below. Then click Create filter.
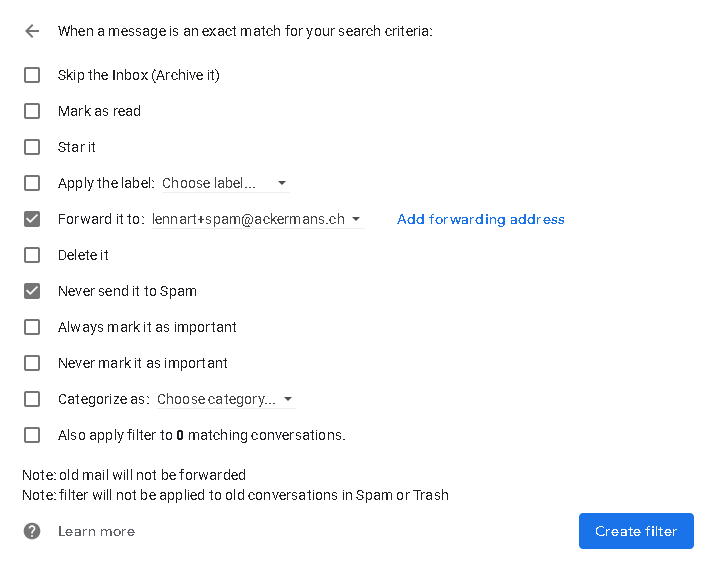
- In the next dialog, select the checkboxes Forward it to: and Never send it to Spam. In the drop down box after Forward it to:, select your email address containing "+spam". Then click Create filter. See the picture below.
- Notify User:Lennart about the email address you're forwarding, so the spam filter can be appropriately configured.
Make sure you set up spam filtering. All set!

